REVIEW · ST KILDA
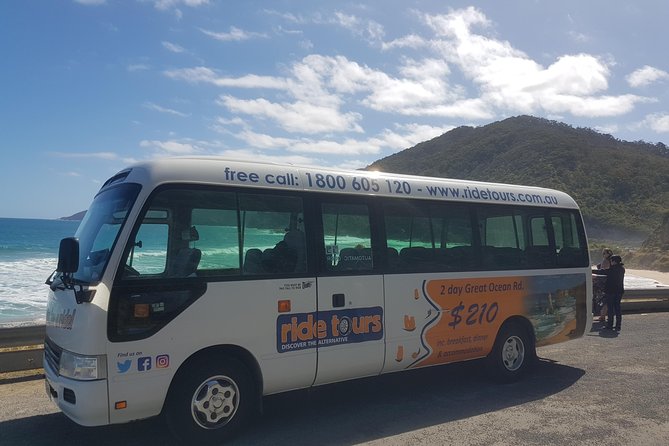
Ride Tours 2 day Great Ocean Road Trip for 18-35 year olds
Book on Viator →Operated by Ride Tours · Bookable on Viator
The Great Ocean Road is a long day dream. This 2-day trip turns it into a low-stress route with big-name stops, included food, and an overnight in St Kilda’s popular backpacker scene. I especially like the reverse direction plan that helps you catch sights before the day-tripper rush, and the built-in breakfast and dinner that saves you from the where-do-we-eat panic. One trade-off: it’s a packed day of short visits—great for ticking off highlights, less ideal if you want long hangs in one place.
You also get a small-group feel with a max of 20 people, and it starts early (7:00am). Stops range from wildlife time at Tower Hill Wildlife Reserve to photo-and-walk stretches like Bay of Martyrs and Mait’s Rest in the Otways. If you have moderate fitness, comfortable walking shoes matter, because you’ll be getting on and off the bus a lot and moving around for viewpoints and short trails.
In This Review
- Key things I’d circle before booking
- Why this Great Ocean Road route runs in reverse
- Price and what you truly get for $233.91
- Day 1: Tower Hill Wildlife, the Grotto, and London Bridge photos
- Stop 1: Tower Hill Wildlife Reserve
- Stop 2: Logan’s Beach (Southern Right whale season)
- Stop 3: Bay of Martyrs
- Stop 4: The Grotto
- Stop 5: London Bridge (photo stop)
- Stop 6: Sow & Piglets Guest House (overnight)
- Day 2: Twelve Apostles sunset, then morning light
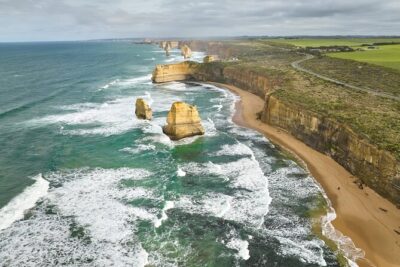
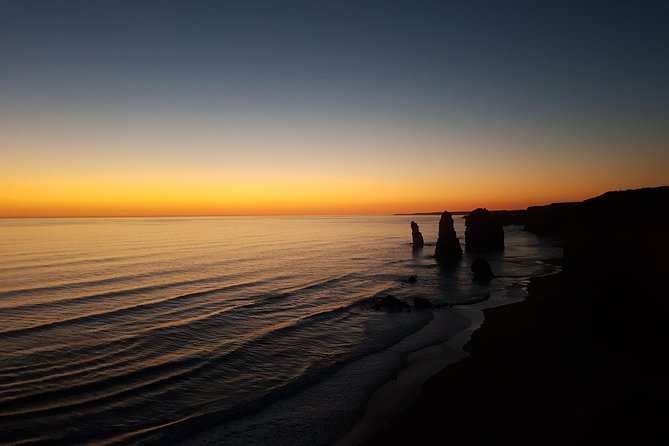
- Stop 7: Twelve Apostles (sunset + morning return)
- Stop 8: Loch Ard Gorge
- Stop 9: Mait’s Rest in the Otways
- Stop 10: Apollo Bay (free time for food and a swim)
- Stop 11: The Lorne Pier (Sammy the Seal and shallows)
- Stop 12: The Great Ocean Road (at a relaxed pace)
- Stop 13: Bells Beach (Rip Curl Pro home turf)
- Guides, group size, and that 18–35 energy
- What to expect from the pace (and the one real drawback)
- Packing and prep tips that actually help
- Who should book this 2-day Great Ocean Road option
- Should you book this Ride Tours 2-day Great Ocean Road Trip from St Kilda?
- FAQ
- How long is the Ride Tours Great Ocean Road Trip?
- What time does the tour start?
- How much does the tour cost?
- What’s included in the price?
- Is lunch included?
- Where do you stay overnight?
- Who is this tour for?
- How big is the group?
- What weather conditions are required?
- Can I cancel for a full refund?
Key things I’d circle before booking
- Reverse route to dodge crowds by traveling opposite the busiest tour flow
- Meals + dorm bed included, so you can budget and travel lighter
- Wildlife-first stops like Tower Hill Wildlife Reserve, plus a chance at Southern Right whales seasonally
- Twelve Apostles twice with sunset and then a morning return for different light
- Small group (max 20) with a young 18–35 vibe
Why this Great Ocean Road route runs in reverse
Most Great Ocean Road tours pile people into the same flow. This one intentionally moves the other way, which can make a noticeable difference the moment you arrive at popular lookouts. You’re not just “seeing the coast”—you’re also pacing your day to help you avoid the heaviest crowds.
I like this approach because it also changes your experience of the scenery. You get time at places like London Bridge and the Grotto without feeling like you’re standing in a queue for every photo.
It’s also a smart fit for a 2-day format. Instead of spending your time competing for space, you get more actual sight time.
You can also read our reviews of more tours and experiences in St Kilda.

Price and what you truly get for $233.91
At $233.91 per person for roughly 2 days, the value comes from what’s included rather than the bus ride alone.
Here’s the practical breakdown: you pay for accommodation, an overnight in a mixed dorm room, a buffet dinner, breakfast, and coffee and/or tea. All the stop admissions listed here are free on the tour schedule, so you’re not constantly calculating entry fees while you’re trying to enjoy the day. Lunch isn’t included, so you’ll still want to plan how you’ll handle that part.
When I look at tour value, I ask: will I spend time researching food and lodging myself? This tour answers no. It also reduces money stress, because you’re not juggling restaurant decisions every couple of hours.
Day 1: Tower Hill Wildlife, the Grotto, and London Bridge photos
Your morning kicks off at 7:00am, so build in an early-night and a decent breakfast habit before pickup. The start time matters because it lets you get into the day while the air is cooler and the wildlife spots are more likely to be active.
Stop 1: Tower Hill Wildlife Reserve
This is the type of stop that makes the rest of the trip feel real. Tower Hill is a sunken volcano area where you can look for Australian icons like kangaroos, emus, and koalas. You’re given about 1 hour, which is enough time to walk, spot wildlife, and still get back to the bus without feeling rushed.
What to watch for: wildlife here tends to be best when you slow down. If you race between sightings, you’ll miss the smaller moments.
Stop 2: Logan’s Beach (Southern Right whale season)
Next up is Logan’s Beach, a winter-focused stop with a chance to see Southern Right whales playing along the coast with their young. It’s a short stop (about 30 minutes), and that makes it feel like a “payoff or photo only” moment.
Consideration: whale sightings aren’t guaranteed. The tour is built around the possibility, so keep expectations flexible.
Stop 3: Bay of Martyrs
Bay of Martyrs is about a 1-hour stroll on the beach in the Bay of Islands National Park. This is a slower, more grounded stop after the wildlife reserve and whale-season hope.
Why it’s worth it: you get a stretch of coast time with room to breathe, rather than only viewpoint clicking.
Stop 4: The Grotto
Then you head into the Grotto area with your guide taking you down. The description for the vibe here is “Mermaids Love Pond,” which is a funny phrase—also, you can see why people remember it. Expect about 30 minutes for the visit.
Small practical note: you’ll want footwear with grip. This kind of walk is usually nicer when you’re not thinking about slipping.
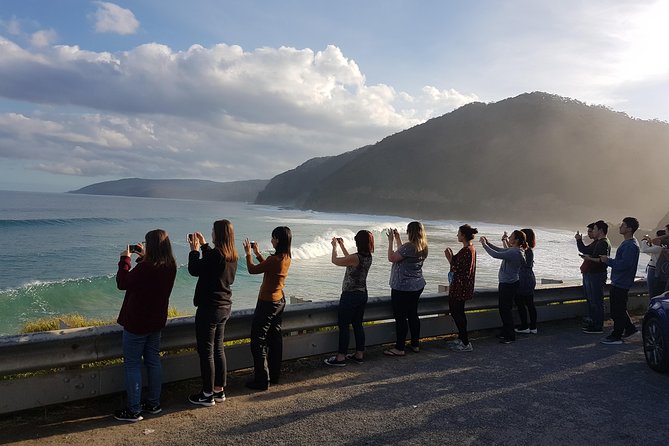
Stop 5: London Bridge (photo stop)
London Bridge is mostly about photos and short stops—about 30 minutes. It’s the kind of iconic Great Ocean Road moment where timing and angles matter, so having a guide helps you find a better place to stand than you’d guess on your own.
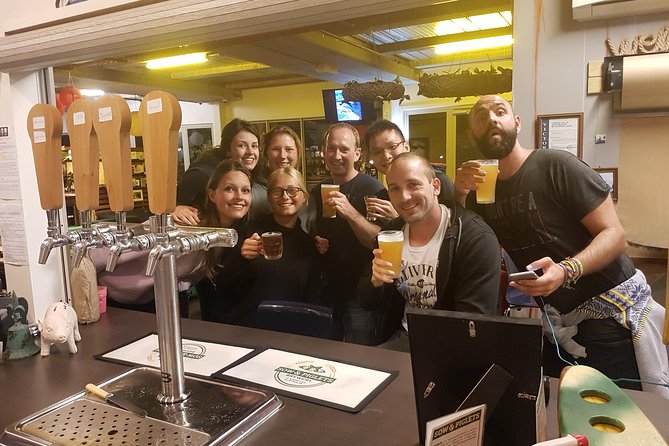
Stop 6: Sow & Piglets Guest House (overnight)
You’ll spend the night at Sow & Piglets Guest House. The standout detail is that it’s the only hostel in Australia with its own craft brewery, so even your downtime has something going on. You get about 12 hours here, and your included dinner is a buffet.
This is also where the tour’s “young 18–35” energy really shows. The dorm format helps people mingle fast, and the group vibe tends to carry from stop to stop.
Day 2: Twelve Apostles sunset, then morning light
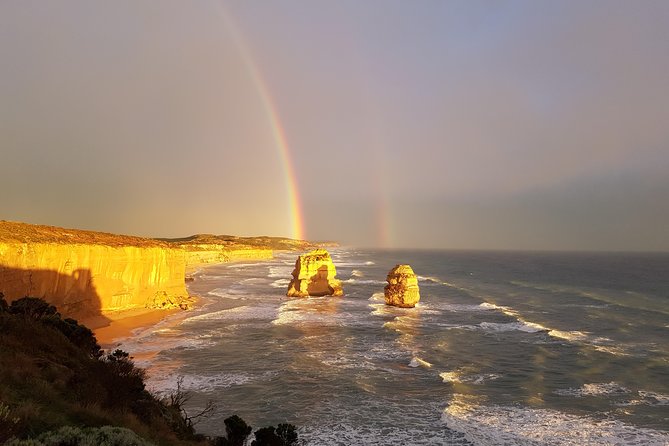
Day 2 is built around the Great Ocean Road’s headline moment: the Twelve Apostles. The schedule includes sunset time and then a return the next morning to see the formations with morning sunlight.
That double hit is the reason this 2-day option feels smarter than the 1-day sprint. Sunset gives drama. Morning gives clarity and a different mood, often without the thickest crowds—especially because you’re not just waking up and rushing in last minute.
Stop 7: Twelve Apostles (sunset + morning return)
You’ll have about 2 hours total associated with this stop, split across the two moments. Plan for the fact that sunset time can be chilly even in warmer months—bring a layer you’d actually wear.
What I like about doing it this way: you’re not only collecting photos. You’re also training your eye to notice how the light changes the look of the limestone stacks.
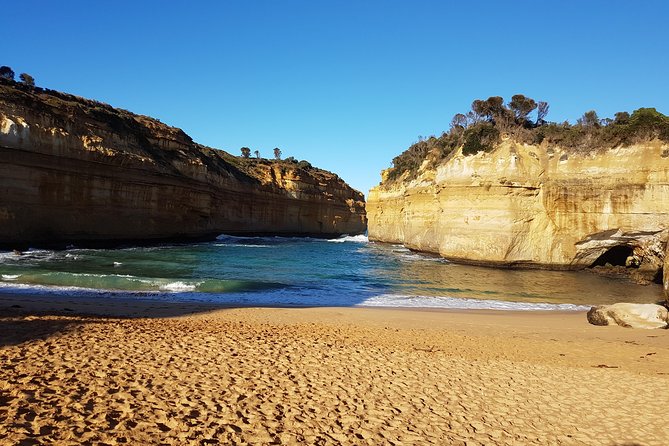
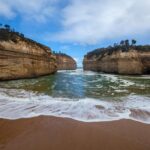
Stop 8: Loch Ard Gorge
After that, it’s Loch Ard Gorge, with about 1 hour for a walk along the beach area surrounded by limestone cliffs. You’ll hear about the Ship Wreck Coast history here, which gives context to the scenery.
How to make this stop pay off: slow down and look at the edges of the cliffs. That’s where the story usually makes more sense than when you just stare straight ahead.
Stop 9: Mait’s Rest in the Otways
Next is Mait’s Rest with a guided walk through cool temperate rainforest in the Otway’s National Park. Time is about 40 minutes.
Rainforest stops can be hit-or-miss if you’re chasing the big coastline shots all day. Here, it works because it’s a contrast day: cliffs and sea on one side, then shaded walking on the other.
Stop 10: Apollo Bay (free time for food and a swim)
Apollo Bay gives you about 1 hour of free time to explore the seaside town. The tour specifically calls out trying beers at a local brew house pub, Dooley’s Ice Cream, and even a swim between the flags on the beach if conditions are good.
This is also the moment to handle lunch, since lunch isn’t included. Having a structured hour means you’re not stuck asking the group every 10 minutes what to do next.
Stop 11: The Lorne Pier (Sammy the Seal and shallows)
Then you roll into Lorne Pier with about 30 minutes. The focus is on a pier walk and checking whether Sammy the Seal is around, plus the chance of stingrays in the shallows.
Consideration: this is still a “check the conditions” situation, not a guaranteed animal spotting.
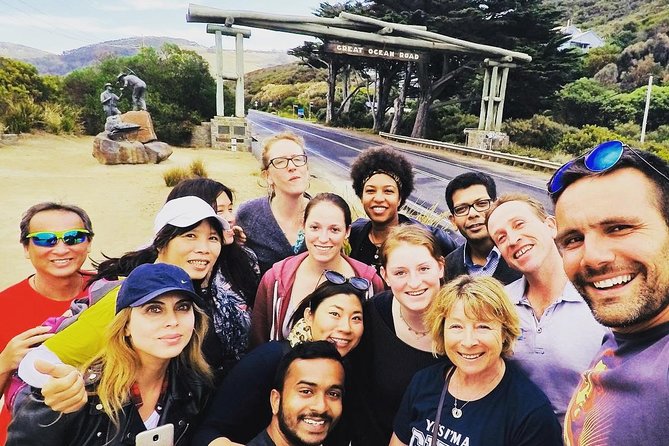
Stop 12: The Great Ocean Road (at a relaxed pace)
You’ll get time on the Great Ocean Road itself, described as seeing every centimetre at a relaxed pace and noting that the coast needs 2 days to do justice. Even if you’ve already driven part of it, having the route packaged matters because you’re not spending your day making detours.
Stop 13: Bells Beach (Rip Curl Pro home turf)
Your last highlight stop is Bells Beach, about 30 minutes. It’s the home of the Rip Curl Pro surfing competition, so it has a built-in “watch the sport” energy even if you’re there for photos rather than competition day.
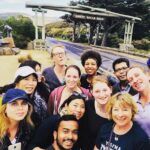
Guides, group size, and that 18–35 energy
This is a tour made for young people (18–35) and capped at 20. That’s a good size for meeting others without feeling like you’re in a school bus with assigned seats.
The guides in the photos and stop descriptions are often high-energy and funny, and the names that show up again and again in guide feedback are Cam, James, and Guy. I love that this kind of trip isn’t run like a lecture. It’s more like: you’re traveling with someone who keeps the pace moving, finds good viewpoints, and keeps morale up.
One standout theme in the feedback is that guides help you spot wildlife. That matters at places like Tower Hill, where the best sightings usually require patience and a bit of local know-how. If your guide is strong at finding koalas and kangaroos, your time feels more rewarding.
What to expect from the pace (and the one real drawback)
This tour does a lot. Expect many stops, often around 30–60 minutes, plus walks at the nature and lookout spots.
The trade-off is simple: you won’t get “settle in for hours” time at every location. If you want long beach hangs, slow photography sessions, or deep rainforest wandering, a different style tour might fit better.
If your goal is classic Great Ocean Road highlights—wildlife, limestone icons, and coastal viewpoints—then this schedule makes sense. You’re built for variety, not for one-location perfection.
Packing and prep tips that actually help
Because the schedule includes beach areas, rainforest walking, and cave-like spots (the Grotto), I’d pack for mixed terrain and changing weather. Bring comfortable shoes with grip and a light rain layer. Also plan for early starts; the 7:00am kickoff is not the time to be discovering what you packed the night before.
Since lunch isn’t included, decide ahead of time whether you’ll grab something in Apollo Bay or use the included free time to eat and reset. It’s easier when you’re not negotiating decisions while hungry.
If you’re sensitive to cold, bring layers for sunset at Twelve Apostles. Even with great weather, it’s common to feel a chill once the day drops.
Who should book this 2-day Great Ocean Road option
Book it if you want:
- a highlight-focused Great Ocean Road trip that still feels paced
- included breakfast, dinner, and accommodation, so you’re not researching daily logistics
- the chance to see Twelve Apostles in both sunset and morning light
- a small group (max 20) and an 18–35 vibe
You might skip it if you:
- want long free-time stretches at just one or two places
- hate early mornings or don’t like constant moving around
- need lots of flexibility around your own meal and lodging planning
Should you book this Ride Tours 2-day Great Ocean Road Trip from St Kilda?
I think this is a strong choice when you want maximum value with less decision fatigue. The reverse-direction idea is practical, and the double Twelve Apostles stop is the kind of upgrade that’s hard to replicate on a one-day tour. Add in the small-group feel, the included dorm stay, and the included breakfast and buffet dinner, and it becomes a clean package for a young-adult Great Ocean Road hit.
If you’re the type who likes to see a lot, move with the day, and leave with photos and stories, this one fits. If you want slow travel and deep linger time, you may feel the schedule is too tight.
FAQ
How long is the Ride Tours Great Ocean Road Trip?
It runs for 2 days, with the schedule spread across multiple stops and an overnight stay.
What time does the tour start?
The start time is 7:00am.
How much does the tour cost?
The price is $233.91 per person.
What’s included in the price?
Accommodation is included as per the itinerary, including an overnight mixed dorm room. You also get a buffet dinner, breakfast, and coffee and/or tea.
Is lunch included?
No. Lunch is not included.
Where do you stay overnight?
You stay overnight at Sow & Piglets Guest House.
Who is this tour for?
The tour is for young people aged 18–35, and it doesn’t take people under 18.
How big is the group?
The maximum group size is 20 travelers.
What weather conditions are required?
This experience requires good weather. If it’s canceled due to poor weather, you’ll be offered a different date or a full refund.
Can I cancel for a full refund?
Yes, you can cancel up to 24 hours in advance for a full refund. If you cancel less than 24 hours before the start time, the amount paid isn’t refunded.